Recent Posts
Preparing Your Bountiful Home for Snowy Weather
1/17/2025 (Permalink)
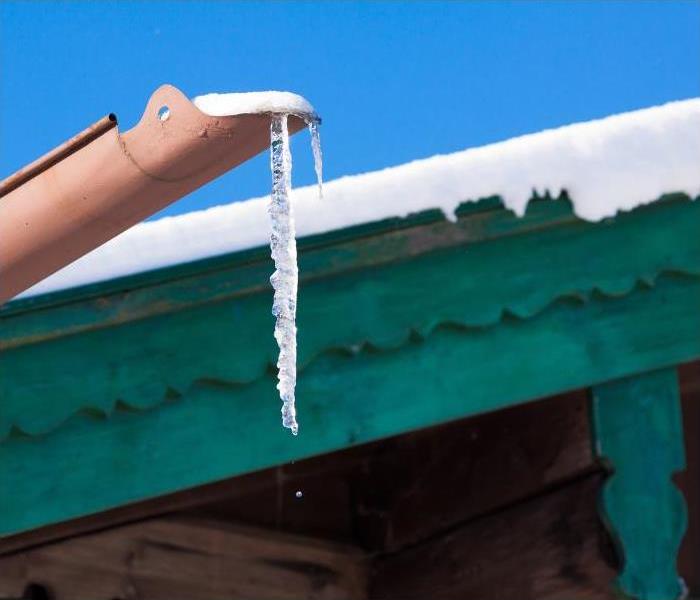 Preparing your home for snowy weather in Bountiful, UT.
As winter continues in full swing, residents of Bountiful, Utah, are bracing for the snowy conditions this months often brings. While snowfall can transform the landscape into a picturesque wonderland, it also poses challenges to homeowners. Snow and cold temperatures can lead to property damage if precautions aren’t taken. SERVPRO® of Bountiful is here to help you prepare your home, handle potential damage, and restore your property to its original condition if the need arises.
In this blog, we’ll discuss the steps you can take to safeguard your home, common issues caused by snow and ice, and how our team can assist you in navigating these challenges.
Understanding the Snow Forecast
According to meteorological forecasts, Bountiful is likely to experience above-average snowfall this month. The National Weather Service predicts a mix of rain and snow early in the month, with more consistent snow showers as temperatures drop. These conditions highlight the importance of preparing your home for snowstorms and freezing weather.
Snowfall can lead to several issues for homeowners, including roof damage, frozen pipes, and ice dams. Taking proactive steps now can save you time, money, and stress later in the season.
Steps to Prepare Your Home for Snowy Weather
1. Inspect and Maintain Your Roof
Your roof is your home’s first line of defense against snow and ice.
- Check for Damage: Look for missing shingles, cracks, or leaks that could worsen under the weight of snow.
- Clean Your Gutters: Clogged gutters can lead to ice dams, which can cause water to seep into your home.
- Install Roof Heating Cables: These can help prevent the formation of ice dams by melting snow before it accumulates.
2. Protect Your Pipes
Freezing temperatures can cause pipes to burst, leading to significant water damage.
- Insulate Exposed Pipes: Use foam insulation to protect pipes in unheated areas like basements, attics, and crawlspaces.
- Drip Faucets: Allowing a small trickle of water to flow can prevent freezing in extremely cold conditions.
- Seal Gaps: Use caulk or weatherstripping to seal gaps around windows, doors, and pipe entry points to keep cold air out.
3. Improve Your Home’s Insulation
Proper insulation not only keeps your home warm but also reduces the risk of ice formation on your roof.
- Add Attic Insulation: This prevents warm air from escaping and melting snow on the roof, which can refreeze and form ice dams.
- Seal Drafts: Check for drafts around windows and doors and seal them with weatherstripping or caulk.
4. Clear Snow Safely
Accumulated snow can strain your roof and block pathways, making it hazardous.
- Use a Roof Rake: This tool helps you safely remove snow from the edges of your roof.
- Shovel Driveways and Walkways: Regularly clear snow to prevent ice formation and ensure safe access.
- Apply De-Icer: Use eco-friendly de-icers to melt ice on driveways and sidewalks.
5. Prepare for Power Outages
Winter storms often lead to power outages.
- Stock Emergency Supplies: Keep flashlights, batteries, blankets, and non-perishable food on hand.
- Invest in a Generator: A portable generator can keep essential appliances running during outages.
Common Snow-Related Issues and How SERVPRO of Bountiful Can Help
Even with the best preparation, winter weather can lead to unexpected property damage. Here are some common issues and how SERVPRO of Bountiful can assist:
1. Roof Damage and Ice Dams
Heavy snow can cause roofs to collapse or develop leaks. Ice dams form when melting snow refreezes at the roof’s edge, preventing proper drainage.
- Our Solution: We provide emergency roof tarping and board-up services to protect your home from further damage. Once the weather clears, we’ll repair any structural damage.
2. Water Damage from Melting Snow
When snow melts quickly, it can overwhelm drainage systems and lead to basement flooding.
- Our Solution: Our water damage restoration services include water extraction, drying, and dehumidification to prevent mold growth and structural damage.
3. Frozen or Burst Pipes
If pipes freeze and burst, they can cause significant water damage in a short amount of time.
- Our Solution: We offer 24/7 emergency water removal and cleanup services. Our technicians will repair the damage and restore affected areas.
4. Fire Risks During Winter
Space heaters, fireplaces, and overloaded electrical circuits are common causes of winter house fires.
- Our Solution: If your home suffers fire damage, we provide comprehensive restoration services, including soot cleanup, odor removal, and structural repairs.
Why Choose SERVPRO of Bountiful?
SERVPRO of Bountiful is your trusted partner for winter weather-related restoration services. Here’s what sets us apart:
1. 24/7 Emergency Response
Disasters don’t wait for business hours, and neither do we. Our team is available around the clock to respond to your emergency.
2. Highly Trained Professionals
Our technicians are IICRC-certified and use state-of-the-art equipment to restore your property quickly and efficiently.
3. Locally Owned and Operated
We’re proud to serve the Bountiful community and understand the unique challenges posed by Utah’s winter weather.
4. Comprehensive Services
From water and fire damage restoration to mold remediation, we handle it all. Our goal is to make it “like it never even happened.”
Be Proactive This Winter
Snowy weather is beautiful, but it’s essential to stay prepared to protect your home and loved ones. By taking the steps outlined in this blog, you can reduce the risk of winter-related damage. And if the unexpected happens, know that SERVPRO of Bountiful is just a phone call away.
Don’t let winter weather disrupt your peace of mind. Contact SERVPRO of Bountiful today for expert advice, emergency services, and professional restoration solutions. Together, we’ll weather the storm and keep your home safe and sound.
Call us now or visit our website to learn more about our services!
New Year, Clean Home: The Importance of Post-Holiday Deep Cleaning
12/16/2024 (Permalink)
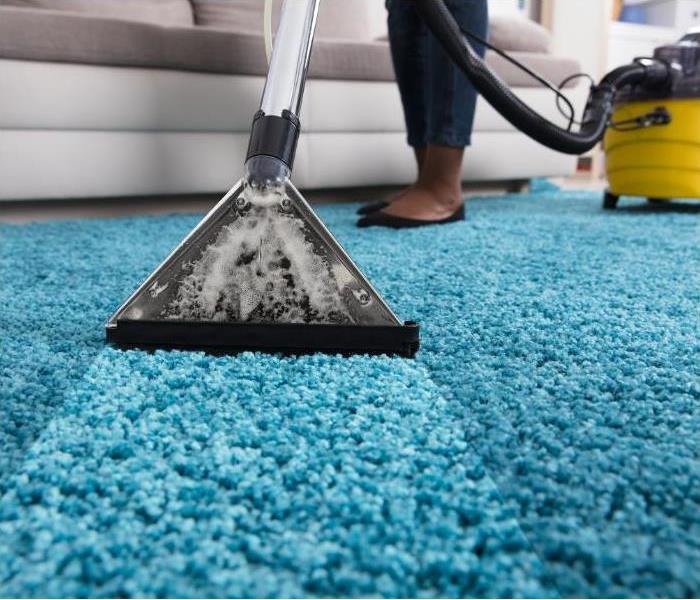
 Deep Cleaning in Bountiful, UT.
The holidays are a time for joy, celebration, and spending time with loved ones. However, once the festivities are over, the aftermath of holiday gatherings, decorations, and winter weather can leave your home in need of a thorough cleanup. January is the perfect time to restore order, refresh your space, and start the year on a clean note. SERVPRO® of Bountiful is Here to Help® with professional cleaning services that go beyond surface-level tidying, ensuring your home is truly ready for the year ahead.
Why Post-Holiday Cleaning Is Essential?
The holiday season often brings increased foot traffic, festive decorations, and, sometimes, a little chaos. Here's why a post-holiday deep clean is so important:
Recover from Holiday Foot Traffic
Family gatherings, holiday parties, and visitors can leave carpets, floors, and upholstery worse for wear. Dirt, mud, and salt from Utah's winter weather can easily find their way indoors, causing wear and tear on surfaces. A deep cleaning helps remove grime and restores your home’s appearance.
Address Post-Decoration Residue
Taking down decorations can leave behind glitter, pine needles, adhesive residue, or scratches. Without proper cleaning, these remnants can linger long after the holiday cheer has ended.
Reduce Allergens and Improve Air Quality
Winter often means sealed windows and less ventilation, trapping dust, pet dander, and other allergens indoors. A thorough cleaning removes these irritants, promoting healthier air quality for your family.
Prevent Long-Term Damage
Spilled drinks, dropped food, or overlooked stains from holiday festivities can lead to long-term damage if not addressed promptly. Deep cleaning ensures that these potential issues are tackled before they become permanent.
Areas That Need Special Attention
While a general tidy-up might be enough for most weeks, post-holiday cleaning requires extra focus on certain areas of the home:
Carpets and Rugs
Carpets can hold onto dirt, allergens, and bacteria, especially during the holiday season. Professional carpet cleaning removes deep-seated grime, leaving them looking and feeling like new.
Upholstery
Sofas, chairs, and other upholstered furniture often bear the brunt of holiday gatherings. Stain removal and fabric cleaning can revive these pieces and extend their lifespan.
Kitchens
From baking marathons to holiday feasts, the kitchen is a hotspot for spills, grease, and odors. Deep cleaning counters, cabinets, and appliances can restore this space to its pre-holiday glory.
Floors
Hard floors can suffer from scuffs, scratches, and dirt buildup during the holidays. Professional cleaning can address these issues and add protective finishes to maintain their shine.
Bathrooms
With extra guests in the house, bathrooms may need extra care. Grout, tile, and fixtures can benefit from a deep cleaning to remove buildup and restore their sparkle.
The SERVPRO Advantage: Why Choose Professional Cleaning?
While regular household cleaning products can handle minor messes, some post-holiday challenges require professional expertise. Here’s why SERVPRO of Bountiful is the best choice for deep cleaning:
Advanced Equipment
SERVPRO uses industry-grade cleaning tools and techniques to tackle even the toughest dirt and stains, ensuring a deeper clean than traditional methods.
Specialized Services
Whether it's carpet cleaning, odor removal, or air duct cleaning, SERVPRO offers a range of services tailored to your home’s needs.
Experienced Technicians
Our trained professionals know how to handle delicate materials, stubborn stains, and high-traffic areas with care and precision.
Time and Energy Savings
Cleaning up after the holidays can be overwhelming. Letting SERVPRO handle the heavy lifting allows you to focus on other priorities.
Health and Safety Focus
Our cleaning products and techniques are designed to improve indoor air quality and eliminate allergens, bacteria, and other contaminants.
Tips for Maintaining a Clean Home Throughout the Year
Once your home has been professionally cleaned, you’ll want to keep it looking its best. Here are some simple tips for year-round maintenance:
Establish a Cleaning Schedule
Break down cleaning tasks into daily, weekly, and monthly checklists to keep your home manageable and prevent buildup.
Invest in Doormats
Placing mats at entryways can help reduce the amount of dirt and debris tracked into your home.
Encourage Shoe-Free Zones
Implementing a no-shoe policy can protect your floors and carpets from mud, salt, and other outdoor elements.
Clean Spills Immediately
Promptly addressing spills and stains can prevent them from becoming permanent or damaging surfaces.
Use Air Purifiers
Air purifiers help reduce dust, allergens, and odors, improving indoor air quality.
How SERVPRO of Bountiful Can Help
SERVPRO of Bountiful is your trusted partner in restoring cleanliness and order to your home. Our comprehensive cleaning services include:
- Carpet and Upholstery Cleaning: Remove dirt, stains, and allergens from your flooring and furniture.
- Odor Removal: Eliminate lingering odors from pets, cooking, or holiday mishaps.
- Air Duct Cleaning: Improve air quality and HVAC efficiency with a professional duct cleaning.
- Tile and Grout Cleaning: Restore the sparkle to your bathroom or kitchen surfaces.
- Post-Construction Cleaning: If your home underwent holiday renovations, we can help remove dust and debris.
Start the Year Right with a Fresh, Clean Home.
The new year is an opportunity for fresh starts, and there’s no better way to embrace it than with a clean and organized home. SERVPRO of Bountiful is here to make your post-holiday cleanup stress-free, thorough, and effective.
Let us help you restore your home’s comfort and beauty after the holiday season. Call us today to schedule your professional cleaning services and start 2024 on a fresh, clean note.
Holiday Safety Tips for a Joyful Christmas Season in Bountiful, UT
11/22/2024 (Permalink)
 Christmas Season in Bountiful, UT
As the Christmas season approaches, homes around Bountiful, UT, will start to glow with twinkling lights, festive decorations, and the warmth of loved ones gathering. Amid the holiday cheer, it’s easy to overlook potential safety hazards. From holiday lights and candles to crowded gatherings, taking a few proactive steps can help keep everyone safe during this joyful season. SERVPRO of Bountiful is here with practical tips to ensure your celebrations are memorable for all the right reasons.
1. Decorate Safely with Christmas Lights
Christmas lights are a staple of holiday decor, but they can also be a fire hazard if not used carefully.
Inspect your lights: Before hanging lights indoors or outside, check for damaged wires, frayed cords, and broken bulbs. Damaged lights should be replaced, as faulty wiring can cause fires.
Use outdoor-rated lights outside: Ensure that lights and extension cords intended for outdoor use are labeled as “outdoor-safe.” Indoor lights might not withstand Bountiful’s cold and snowy weather.
Don’t overload outlets: Plugging too many strings of lights into one outlet can cause overheating. Follow the manufacturer’s guidelines on the maximum number of light strands you can safely connect.
Turn off lights when you’re away or asleep: Use a timer or make it a habit to turn off holiday lights before leaving home or going to bed to avoid overheating and reduce fire risks.
2. Exercise Candle Safety
Candles add a cozy glow to your Christmas decor, but open flames increase the risk of fires.
Keep candles in safe locations: Place candles on stable, heat-resistant surfaces, away from anything flammable like curtains, decorations, or papers.
Never leave candles unattended: Always extinguish candles before leaving a room or going to bed.
Opt for battery-operated candles: These flameless options provide the same warm ambiance without the risk of open flames.
Keep candles out of reach of children and pets: This precaution prevents accidental burns and keeps young ones safe around festive decorations.
3. Maintain a Safe Christmas Tree
Whether you opt for a real tree or an artificial one, taking a few safety measures can keep it fire-safe throughout the holiday.
Choose a fresh tree: If you’re bringing home a real tree, pick one with green, moist needles that don’t easily fall off. A dry tree can become a fire hazard.
Keep the tree well-watered: A well-hydrated tree is less likely to catch fire. Check and refill the water level daily.
Place the tree away from heat sources: Keep the tree at least three feet away from fireplaces, space heaters, radiators, and candles.
Use non-combustible decorations: Avoid flammable ornaments, garlands, and other materials that could ignite near a heat source or lights.
4. Safe Use of Space Heaters and Fireplaces
During Bountiful’s chilly winters, many rely on space heaters and fireplaces to keep warm.
Inspect and maintain your fireplace: Have your chimney inspected and cleaned annually by a professional to prevent creosote buildup, which can lead to chimney fires.
Use a fireplace screen: Place a metal or heat-tempered glass screen in front of the fireplace to contain sparks and prevent embers from escaping.
Keep space heaters away from flammable items: Maintain at least a three-foot clearance around space heaters. Don’t place them near the Christmas tree, furniture, or curtains.
Turn off heaters when not in use: Make sure to turn off space heaters before going to sleep or leaving the room.
5. Be Cautious with Holiday Cooking
The holiday season brings family feasts and delicious treats, but the kitchen is one of the main places where accidents can happen.
Never leave cooking unattended: Cooking fires are more common during the holidays. If you need to leave the kitchen, turn off the stove or ask someone to watch the food.
Keep a fire extinguisher nearby: Make sure your kitchen has a functioning fire extinguisher and that everyone in the household knows how to use it.
Avoid wearing loose clothing: Loose sleeves and clothing can accidentally catch fire while cooking. Wear fitted or rolled-up sleeves to avoid hazards.
Practice safe turkey frying: If you plan to deep-fry a turkey, make sure it’s completely thawed to avoid oil splattering, and only use the fryer outdoors on a flat, non-combustible surface.
6. Take Care with Holiday Gatherings
Christmas is a time for gathering with friends and family, but crowded spaces and increased activity can create some risks.
Keep walkways clear: Avoid clutter near entrances, hallways, and stairs to prevent tripping. Keep cords, decorations, and shoes out of high-traffic areas.
Check your smoke alarms: With more cooking and decorations around, it’s especially important to have working smoke alarms. Test each alarm and replace batteries if needed.
Limit open flames: If you’re using candles for ambiance, keep them away from areas where guests may accidentally bump into them.
Have a designated fire escape plan: Ensure everyone knows where to go in case of an emergency. Having a plan is crucial, especially when you have guests unfamiliar with your home layout.
7. Prevent Electrical Overloads
From festive lights to extra appliances, the holiday season can put a strain on your electrical system.
Avoid using damaged cords: Frayed or cracked cords should be replaced. Damaged wires increase the risk of sparks and electrical fires.
Use surge protectors: When plugging in multiple decorations and appliances, use surge protectors to prevent electrical overloads.
Distribute load among outlets: Instead of plugging everything into a single outlet or power strip, spread out your lights and decorations across multiple outlets.
Limit extension cord use: Excessive extension cord use can lead to overheating and tripping hazards. If you need more outlets, consider hiring an electrician to install additional ones.
8. Be Prepared for Emergencies
Even with precautions, accidents can happen. Being prepared can make all the difference.
Keep emergency contacts handy: Write down important contacts, such as the fire department, SERVPRO of Bountiful, and local emergency services, in an accessible location.
Prepare an emergency kit: Include basic first aid supplies, a flashlight, batteries, water, and non-perishable snacks.
Know how to turn off utilities: Familiarize yourself and your family with the location of shut-off valves for water, gas, and the main electrical panel.
Consider fire extinguisher training: Knowing how to use a fire extinguisher effectively can be invaluable in an emergency. A quick refresher for everyone in your household can provide peace of mind.
9. Child and Pet Safety Precautions
Children and pets add a lot of joy to the season but need extra attention around holiday decorations and festivities.
Avoid breakable ornaments: Keep fragile decorations and small ornaments, which can be choking hazards, out of reach of children and pets.
Secure decorations: Make sure larger decorations and trees are secure and won’t easily tip over.
Keep plants out of reach: Many popular holiday plants like poinsettias, mistletoe, and holly berries are toxic to pets and children if ingested.
Celebrate the Holidays Safely with SERVPRO of Bountiful
At SERVPRO of Bountiful, we want you to have a joyous, safe holiday season. By taking a few preventative steps, you can enjoy all the warmth and joy of the Christmas season without the risk of accidents. And should the unexpected occur, remember that SERVPRO® is always Here to Help® with fire, water, or smoke damage restoration.
From our SERVPRO family to yours, we wish you a merry and safe Christmas season in Bountiful!
Essential Fall Home Maintenance Tips for Bountiful, UT
10/21/2024 (Permalink)
 Essential Fall Home Maintenance in Bountiful, UT
As the leaves change color and the air turns crisp, fall is a beautiful season in Bountiful, Utah. However, along with the stunning autumn scenery, it also marks the time to prepare your home for the upcoming winter months. Effective fall home maintenance not only protects your investment but also ensures your home remains safe, warm, and energy-efficient throughout the winter. Here’s a comprehensive guide to help you navigate your fall home maintenance checklist.
1. Inspect and Clean Gutters
One of the most crucial tasks during fall is to inspect and clean your gutters. With trees shedding their leaves, clogged gutters can lead to various issues, such as water damage, mold growth, and even ice dams in winter.
How to Clean Your Gutters: Use a sturdy ladder and wear gloves. Remove leaves, twigs, and debris, ensuring water can flow freely. If you’re uncomfortable doing this yourself, consider hiring a professional service.
Install Gutter Guards: To minimize the frequency of cleaning, consider installing gutter guards. These devices keep debris out while allowing water to flow through, reducing the need for regular maintenance.
2. Check Your Heating System
With temperatures dropping, ensuring your heating system is in optimal working order is vital. A malfunctioning heater can leave your home cold and uncomfortable during the winter months.
Schedule a Professional Inspection: Before the cold sets in, schedule a professional inspection to check for any potential issues. This may include cleaning and servicing your furnace or boiler, ensuring it's safe and efficient.
Change Air Filters: Dirty air filters can restrict airflow and reduce efficiency. Change your air filters monthly during the heating season to keep your system running smoothly.
3. Seal Windows and Doors
Drafty windows and doors can lead to significant heat loss, driving up your energy bills. Sealing gaps not only improves your home’s energy efficiency but also enhances comfort.
Inspect Weather Stripping: Check the weather stripping around windows and doors for wear and tear. Replace any damaged or missing strips to create a tight seal.
Use Caulk: For any gaps or cracks, use caulk to seal the edges around your windows and doors. This simple step can dramatically reduce air leakage and improve your home’s insulation.
4. Prepare Your Yard
Your yard requires attention during the fall to prepare for winter and ensure it thrives in the spring.
Rake Up Leaves: Regularly raking leaves prevents mold growth and keeps your lawn healthy. Decomposing leaves can suffocate your grass and create a breeding ground for pests.
Trim Trees and Shrubs: Fall is an excellent time to trim back dead or overgrown branches, especially those that could become hazards during winter storms. This will also promote healthy growth in the spring.
Plant Fall Bulbs: Consider planting perennials or spring-blooming bulbs like tulips and daffodils. Planting in the fall allows them to establish roots before winter, ensuring a vibrant garden come spring.
5. Check Smoke and Carbon Monoxide Detectors
With the increased use of heating systems, safety should be a top priority.
Test Detectors: Regularly test your smoke and carbon monoxide detectors to ensure they are functioning correctly. If they beep or show signs of malfunction, replace the batteries immediately.
Replace Old Detectors: If any of your detectors are over ten years old, it’s time for a replacement. Newer models are often more reliable and come with advanced features for enhanced safety.
6. Insulate Pipes
Bountiful experiences cold winters, so insulating your pipes is essential to prevent freezing and bursting.
Locate Exposed Pipes: Identify any exposed pipes in unheated areas, such as basements, attics, and garages.
Use Pipe Insulation: Insulate pipes with foam sleeves or wrapping them with insulating tape. This precaution helps maintain water temperature and prevents potential damage during frigid weather.
7. Clean and Store Outdoor Furniture
As the weather shifts, it’s time to transition your outdoor spaces.
Clean Your Furniture: Remove dirt and debris from your outdoor furniture and grill. Use a mild detergent and water, then allow them to dry completely.
Store or Cover: Store your furniture in a dry place, or if that’s not possible, cover them with weather-resistant tarps. This will protect them from harsh winter conditions and prolong their lifespan.
8. Review Your Emergency Preparedness Plan
Winter weather can be unpredictable, making it essential to have an emergency preparedness plan.
Gather Supplies: Ensure you have a supply of essentials like non-perishable food, water, and medical supplies. Having a stock of necessary items can make a significant difference during emergencies.
Backup Power: Consider investing in a generator to keep your home powered during outages. This is especially crucial if you rely on electric heat.
9. Check Your Roof
Your roof is your home’s first line of defense against the elements. Ensuring it’s in good condition can prevent leaks and costly repairs down the line.
Inspect for Damage: Look for missing or damaged shingles and check for any signs of leaks or wear. If you spot any issues, contact a roofing professional to assess and make repairs.
Clean Your Roof: Remove any debris from your roof to prevent water buildup. If you notice any moss or algae, consider hiring a professional to clean your roof to maintain its longevity.
10. Test Your Sprinkler System
If you have an irrigation system, it’s important to winterize it before the first freeze.
Drain the System: Shut off the water supply to your sprinkler system and drain the pipes to prevent freezing and cracking.
Adjust Settings: If applicable, adjust your system settings for the seasonal change to avoid unnecessary watering during the colder months.
Taking the time to complete these fall maintenance tasks can save you time, money, and stress during the winter months. By preparing your Bountiful home now, you can enjoy the beauty of fall and the comfort of winter without the worry of unexpected repairs. A little proactive care can make a significant difference in your home’s efficiency, safety, and overall comfort. Embrace the season by keeping your home in top shape and looking forward to a warm and cozy winter ahead.
Expert Mold Damage Cleanup and Restoration
9/24/2024 (Permalink)
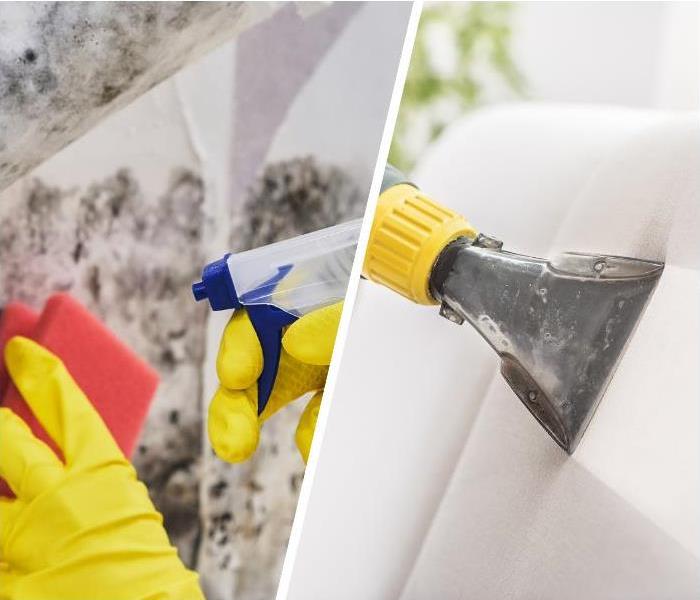
 Cleaning and Disinfection Mold in Bountiful, UT.
Water damage is an unfortunate reality for many homeowners in Bountiful, UT. Whether caused by a burst pipe, a leaky roof, or heavy rainfall, the aftermath of water intrusion can lead to severe issues if not addressed promptly. One of the most concerning problems that can arise from water damage is mold growth. Mold can begin to grow within 24 to 48 hours after water damage occurs, making it essential to act quickly. We understand the complexities of mold damage cleanup and restoration, and we’re here to guide you through every step of the process.
Understanding Mold Growth and Its Risks
Mold is a type of fungus that thrives in damp environments. When water damage occurs, it creates the perfect conditions for mold spores to settle and grow. Mold can spread rapidly, affecting not only the visible surfaces but also hidden areas such as behind walls and under floors.
The presence of mold can have serious consequences for both your home and your health. Mold can cause structural damage to your property and lead to health problems.
Our Mold Damage Restoration Process
We take a systematic approach to mold damage cleanup and restoration. Our goal is to ensure your home is thoroughly restored to a safe and healthy condition. Here’s what you can expect from our comprehensive process:
1. Assessment and Inspection
The first step in mold damage restoration is a thorough inspection of your property. Our team of certified technicians will assess the extent of the water damage and identify areas affected by mold growth. We use advanced moisture detection tools and mold-testing methods to pinpoint the source of the problem and determine the best course of action.
2. Containment and Protection
To prevent mold spores from spreading to unaffected areas of your home, we establish containment barriers. This typically involves setting up physical barriers and using air scrubbers to filter out airborne mold spores. We also use negative air pressure to ensure that contaminated air does not escape the affected area.
3. Removal and Disposal
Once containment is in place, we begin the process of removing mold-infested materials. This may include drywall, insulation, flooring, and other porous materials that have been compromised by mold. Proper disposal of these materials is crucial to prevent further contamination.
4. Cleaning and Disinfection
After removing contaminated materials, we thoroughly clean and disinfect the affected areas. We use specialized cleaning agents and equipment to eliminate mold spores from surfaces. This step may involve using antimicrobial treatments to prevent future mold growth and ensure all affected areas are sanitized.
5. Restoration and Repairs
With the mold removed and the area cleaned, we proceed to the restoration phase. This involves repairing or replacing any damaged structures or materials, such as drywall, flooring, or insulation. Our team works to restore your home to its pre-damage condition, addressing any issues caused by the water damage and mold growth.
6. Final Inspection and Prevention
Once the restoration work is complete, we conduct a final inspection to ensure that all mold and water damage issues have been addressed. We also provide recommendations for preventing future mold growth, which may include addressing any ongoing moisture problems or making improvements to your home’s ventilation system.
Why Choose Us?
Choosing us for your mold damage cleanup and restoration needs offers several advantages:
Expertise and Experience: Our team is trained and certified in mold remediation and water damage restoration. We have extensive experience handling mold-related issues in various types of properties.
State-of-the-Art Equipment: We use advanced equipment and techniques to detect and remove mold effectively. Our tools and technology ensure that we address the problem thoroughly and efficiently.
Rapid Response: We understand the urgency of mold damage and strive to respond quickly to your call. Our prompt service helps minimize the extent of the damage and reduces the risk of further complications.
Comprehensive Service: From the initial assessment to the final restoration, we handle every aspect of the mold remediation process. Our goal is to make the process as smooth and stress-free as possible for you.
Local Knowledge: As a locally owned and operated business, we have a deep understanding of the specific challenges faced by homeowners in Bountiful, UT. We are familiar with the local climate and conditions that can contribute to mold growth, allowing us to provide tailored solutions for your needs.
Preventing Future Mold Growth
Preventing future mold growth involves addressing the underlying causes of moisture problems in your home. Here are some tips to help you reduce the risk of mold:
Fix Leaks Promptly: Repair any leaks in your plumbing, roof, or windows as soon as they are detected. Addressing these issues promptly can prevent moisture from accumulating and creating a breeding ground for mold.
Improve Ventilation: Ensure that your home is well-ventilated, especially in areas prone to moisture, such as bathrooms and kitchens. Use exhaust fans and open windows to reduce humidity levels.
Maintain Proper Drainage: Ensure that your property has proper drainage to prevent water from pooling around the foundation. Keep gutters and downspouts clear of debris to direct water away from your home.
Monitor Humidity Levels: Use a dehumidifier to keep indoor humidity levels between 30-50%. This can help prevent mold growth and maintain a healthy indoor environment.
Regular Inspections: Conduct regular inspections of your home for signs of moisture problems or mold growth. Early detection can help prevent more extensive damage and reduce the risk of mold.
Mold damage cleanup and restoration is a critical service for homeowners dealing with the aftermath of water damage. We are dedicated to providing top-quality mold remediation services to ensure your home is safe, clean, and restored to its original condition. If you experience water damage in your Bountiful, UT home, don’t hesitate to contact us for expert assistance. Our team is ready to help you navigate the challenges of mold damage and restore your home to its best possible state.
3 Essential Steps for Deep Cleaning Your Home After a Flood
8/31/2024 (Permalink)
 Deep cleaning after flood in Bountiful, UT
Floods can be devastating, causing damage to homes and belongings while leaving behind a mess that can be challenging to clean. After ensuring your safety and addressing immediate concerns, the next crucial task is to deep clean your home to prevent further damage and restore it to its pre-flood condition. Here are three essential steps for deep cleaning your home after a flood:
1. Safety First: Assess and Prepare
Before diving into the cleaning process, it’s vital to prioritize safety. Floodwaters can carry harmful contaminants, and the risk of mold growth increases once the water recedes. Here’s how to start safely:
Inspect the Damage: Carefully assess the extent of the damage. Look for structural issues, such as warped floors or compromised walls, and check for hazards like exposed electrical wires. If the damage appears extensive, consider consulting a professional restoration service.
Wear Protective Gear: Equip yourself with safety gear, including gloves, masks, and waterproof boots. Floodwater can contain harmful bacteria, chemicals, and debris, so protection is crucial.
Turn Off Utilities: Ensure that the electricity and gas are turned off before you start cleaning. This prevents electrical hazards and further damage to your home’s systems. Contact a professional if you’re unsure how to safely turn off utilities.
Document the Damage: Take photos or videos of the damage for insurance purposes. This documentation will be valuable when filing claims and seeking compensation for repairs and replacements.
2. Remove and Clean Contaminated Items
Floodwaters can leave behind debris and contaminants that pose health risks and contribute to further damage. Efficiently removing and cleaning affected items is essential to restore your home. Here’s how to proceed:
Remove Standing Water: Use pumps, wet vacuums, or mops to remove any remaining water from floors and surfaces. Ensure the area is as dry as possible to prevent mold growth.
Discard Contaminated Items: Items such as carpets, furniture, and personal belongings that cannot be thoroughly cleaned and disinfected should be discarded. Mold and contaminants can be challenging to remove from porous materials.
Clean and Disinfect: For items that can be salvaged, thoroughly clean and disinfect them. Use a mixture of water and detergent to clean surfaces, followed by a disinfectant solution to kill bacteria and mold spores. Pay special attention to areas that were in direct contact with floodwater.
Dry Everything Thoroughly: Proper drying is crucial to prevent mold growth. Use fans, dehumidifiers, and open windows to enhance ventilation and accelerate drying. Ensure that all affected areas, including walls and floors, are completely dry before moving on to repairs.
3. Repair and Restore Your Home
Once your home is clean and dry, the next step is to address any repairs and restoration needed to bring it back to its pre-flood condition. This process involves:
Assess Structural Damage: Inspect walls, floors, and ceilings for damage. Look for signs of warping, cracking, or swelling. If you notice significant damage, consult a professional contractor to evaluate the repairs needed.
Address Mold and Mildew: Mold can begin to grow within 24-48 hours of water exposure, so it’s essential to address any signs of mold promptly. If you spot mold, use a mixture of water and detergent to scrub affected areas. For extensive mold problems, consider hiring a mold remediation specialist.
Repair and Replace: Begin repairing damaged structures and replacing any items that were beyond cleaning. This may include installing new drywall, replacing flooring, or fixing damaged insulation. Ensure that repairs are completed to a high standard to prevent future issues.
Prevent Future Flooding: To reduce the risk of future flooding, consider implementing preventive measures such as installing sump pumps, sealing basement walls, and elevating electrical appliances. Regular maintenance and inspection of your home’s drainage systems can also help prevent future water damage.
Deep cleaning your home after a flood is a crucial process that requires careful attention to detail and safety. By following these three essential steps—assessing and preparing, removing and cleaning contaminated items, and repairing and restoring—you can effectively address the aftermath of a flood and restore your home to its original condition. Remember, while these steps provide a general guide, each flooding situation is unique, and you may need to consult professionals for extensive damage or specialized tasks. At SERVPRO® , we understand the challenges of flood damage and are here to help you every step of the way, ensuring your home is clean, safe, and restored.
Pet Fire Safety Tips for Residential Homes in Bountiful, UT
7/18/2024 (Permalink)
 Pet Fire Safety Tips for Homes in Bountiful, UT
Ensuring the safety of our beloved pets is a crucial aspect of overall fire safety in residential homes. Bountiful, UT, with its picturesque neighborhoods and vibrant community, is a wonderful place to raise pets. However, just like humans, pets can be vulnerable during a fire emergency. In this blog, we'll explore essential pet fire safety tips tailored specifically for homes in Bountiful, UT, to help you protect your furry companions.
1. Create a Pet Evacuation Plan
Having a clear evacuation plan that includes your pets is vital. Identify multiple escape routes from your home and ensure each family member knows their role in evacuating pets safely. Practice this plan regularly so everyone is prepared during an emergency.
2. Use Pet Alert Stickers
Place pet alert stickers on your doors or windows to inform firefighters of the number and types of pets inside your home. These stickers are readily visible and indicate to rescuers that animals may need saving, even if you're not there to inform them.
3. Keep Collars and ID Tags Updated
Ensure your pets wear collars with updated identification tags that include your current contact information. In the chaos of a fire, pets can easily become scared and disoriented, potentially fleeing from rescuers. Proper identification increases the chances of a safe reunion.
4. Include Pets in Fire Drills
Practice fire drills regularly with your pets to get them accustomed to the sound of alarms and the evacuation process. This familiarity can reduce stress and increase cooperation during a real emergency.
5. Safely Store Flammable Materials
Keep flammable items such as candles, oils, and cleaning products securely stored in cabinets that pets cannot access. Curious pets might knock over these items, leading to accidental fires.
6. Use Flameless Candles
Opt for flameless candles or LED candles instead of traditional candles. Pets, especially cats and dogs with wagging tails, can accidentally knock over lit candles, posing a fire hazard.
7. Secure Stove and Oven Knobs
Pets, especially those with a knack for exploration, can accidentally turn on stove or oven knobs, potentially starting a fire. Invest in knob covers or guards to prevent pets from inadvertently activating appliances.
8. Inspect Heating Sources
Regularly inspect heating sources such as space heaters, furnaces, and fireplaces for potential hazards. Ensure that these appliances are pet-proofed by using safety gates or screens to prevent pets from getting too close.
9. Keep Fire Extinguishers Accessible
Place fire extinguishers in easily accessible areas of your home, including near potential fire hazard areas like kitchens and fireplaces. Train yourself and family members on how to use them safely and effectively.
10. Consider Pet Monitoring Systems
Invest in pet monitoring systems that integrate with smoke detectors or security systems. These systems can alert you remotely if smoke or fire is detected, allowing you to take immediate action, even if you're away from home.
By implementing these pet fire safety tips in your Bountiful, UT home, you can significantly reduce the risk of harm to your pets during a fire emergency. Preparedness and vigilance are key to ensuring the safety and well-being of both your family and your furry companions. Stay informed, stay proactive, and stay safe.
Restoring Hope: SERVPRO's Comprehensive Remediation Steps for Storm Damage in Bountiful, UT
7/3/2024 (Permalink)
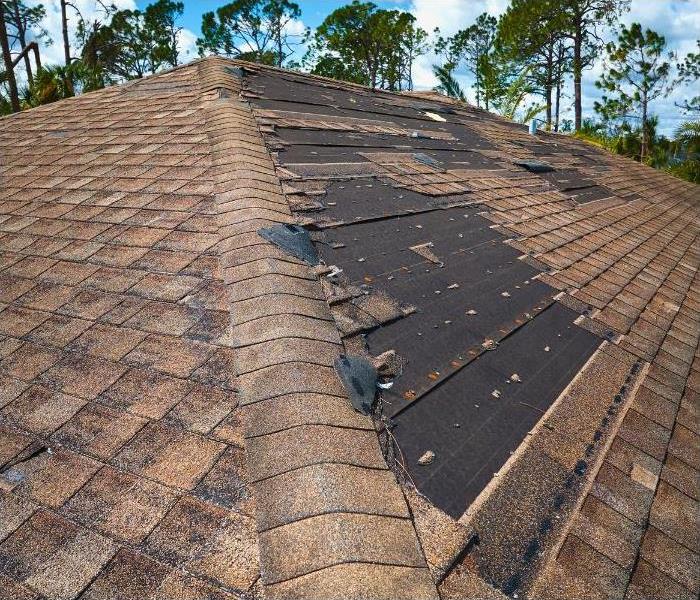 Storm Damage in Bountiful, UT
Storms are unpredictable and can wreak havoc on communities, causing extensive damage to homes and businesses. In Bountiful, UT, residents are no strangers to the destructive power of severe weather. When disaster strikes, timely and effective response is crucial to mitigate damage and restore normalcy. This is where we step in, offering professional storm damage remediation services that combine expertise, advanced technology, and a compassionate approach. Let's delve into the comprehensive steps we take to restore properties affected by storm damage in Bountiful, UT.
1. Emergency Contact and Rapid Response
The first step in our storm damage remediation process is ensuring immediate response. Storm damage can worsen quickly if not addressed promptly, so we provide 24/7 emergency services. When you contact us, a representative will gather essential information about the damage and dispatch a team to your location. This rapid response helps prevent further damage and sets the stage for an efficient restoration process.
2. Thorough Inspection and Assessment
Upon arrival, our highly trained technicians conduct a thorough inspection and assessment of the property. This step involves identifying the extent of the damage, potential safety hazards, and areas that require immediate attention. Using advanced moisture detection equipment, the team can pinpoint hidden water damage that might not be visible to the naked eye. This comprehensive assessment is critical in developing a tailored remediation plan.
3. Board-Up and Roof-Tarp Services
Storms can cause significant structural damage, including broken windows, compromised roofs, and damaged walls. To protect the property from further damage and unauthorized access, we offer board-up and roof-tarp services. These temporary measures help shield the interior from the elements and provide a safer environment for the restoration crew to work.
4. Water Removal and Drying
Water intrusion is a common consequence of storm damage, leading to potential mold growth and structural deterioration if not addressed quickly. We utilize powerful pumps and industrial-grade wet/dry vacuums to remove standing water from the property. Once the bulk of the water is extracted, specialized equipment, such as air movers and dehumidifiers, is deployed to dry affected areas thoroughly. This step is crucial in preventing secondary damage and mold infestation.
5. Debris Removal and Clean-Up
Storms often leave behind a trail of debris, including fallen trees, broken branches, and damaged building materials. Our team clear the site of all debris, ensuring safe and unobstructed access to the affected areas. This clean-up process also involves removing any hazardous materials and addressing potential biohazards to create a safe working environment.
6. Mold Remediation
In the aftermath of a storm, the presence of moisture can create an ideal environment for mold growth. Our technicians are trained in mold remediation techniques to identify and eliminate mold colonies. Using specialized cleaning products and equipment, the team removes mold and prevents its recurrence. This step not only protects the structural integrity of the property but also ensures a healthier living environment for the occupants.
7. Restoration of Structural Damage
Restoring the structural integrity of a storm-damaged property is a critical aspect of our remediation process. This step may involve repairing or replacing damaged roofs, walls, floors, and windows. Our work with skilled contractors and utilizes high-quality materials to ensure that the repairs meet industry standards. The goal is to restore the property to its pre-storm condition, making it safe and habitable once again.
8. Content Restoration and Cleaning
Personal belongings and valuable items can suffer damage during a storm. We offer comprehensive content restoration services to salvage and restore these items. Using specialized cleaning techniques and equipment, the team cleans, sanitizes, and deodorizes affected belongings. This step not only helps preserve sentimental items but also reduces the overall cost of replacement.
9. Odor Removal
Storm damage can leave behind unpleasant odors due to water intrusion, mold growth, and debris. We employ advanced deodorization techniques to eliminate these odors, ensuring that the property smells fresh and clean. This step involves using industrial-grade air scrubbers, thermal foggers, and other odor-neutralizing equipment to remove lingering smells.
10. Final Inspection and Quality Assurance
Once the remediation and restoration processes are complete, we conduct a final inspection to ensure that all work meets their high standards of quality and safety. This step involves a thorough review of the property to confirm that no issues have been overlooked. The team addresses any remaining concerns and ensures that the property is fully restored and ready for occupancy.
11. Insurance Claim Assistance
Navigating the insurance claims process can be overwhelming, especially in the wake of a storm. We assist clients in documenting the damage and provides detailed reports to support insurance claims. This step ensures that clients receive the compensation they deserve and helps expedite the claims process.
12. Ongoing Support and Monitoring
Even after the immediate remediation and restoration are complete, we continue to offer support and monitoring. The team provides guidance on preventative measures to protect the property from future storm damage and conducts follow-up visits to ensure that no issues arise post-restoration.
In Bountiful, UT, where storms can cause significant disruption and damage, we stand as a reliable partner in the recovery process. Their comprehensive storm damage remediation steps, from emergency response to final inspection, demonstrate a commitment to quality, safety, and customer satisfaction. By choosing us, residents and business owners can rest assured that their properties are in capable hands, and their journey to recovery will be handled with care and professionalism. When storms strike, we are there to help restore hope and rebuild communities.
5 Essential Tips to Reduce Flooding Risks in Your Bountiful, UT Home
5/18/2024 (Permalink)
 Reduce Flooding Risks in Bountiful, UT.
Living in Bountiful, Utah, with its stunning mountain views and proximity to nature, offers a serene and beautiful lifestyle. However, it's not immune to the occasional challenges posed by Mother Nature. Among these challenges, flooding stands out as a significant concern, especially given Utah's diverse climate and occasional heavy rains. Whether you're a new homeowner or a long-time resident, taking proactive steps to mitigate flooding risks is crucial. Here are five essential tips to safeguard your Bountiful home against flooding.
1. Understand Your Property's Flood Risk:
The first step in flood risk reduction is understanding your property's vulnerability. Bountiful, like many areas in Utah, can experience flash floods, particularly in low-lying areas or those close to rivers and streams. FEMA's Flood Map Service Center provides detailed flood maps that can help you assess your property's flood risk. Understanding your risk level allows you to take appropriate measures to protect your home and belongings.
2. Invest in Flood Insurance:
Many homeowners mistakenly believe that their standard homeowner's insurance policy covers flood damage. However, most policies specifically exclude flood-related losses. In a flood-prone area like Bountiful, investing in separate flood insurance is essential. The National Flood Insurance Program (NFIP) offers flood insurance policies that can provide financial protection in the event of flood damage. Additionally, some private insurers offer flood insurance coverage, so it's worth exploring your options to find the best policy for your needs.
3. Maintain Your Gutters and Downspouts:
Properly functioning gutters and downspouts are your first line of defense against water intrusion into your home. In Bountiful, where heavy snowfall in winter and sudden rainstorms in other seasons are common, keeping your gutters clear of debris is crucial. Clogged gutters can lead to water overflow, which can seep into your home's foundation, causing structural damage and increasing the risk of flooding. Regularly inspect and clean your gutters and downspouts to ensure they are free of leaves, twigs, and other debris.
4. Install Sump Pumps and Backup Systems:
For homes with basements or low-lying areas prone to flooding, installing a sump pump can be an effective way to mitigate flood risks. Sump pumps are designed to remove excess water from the basement or crawl space, preventing flooding and water damage. Consider installing a battery-powered backup sump pump system to ensure continuous operation during power outages, which often occur during severe storms. Regular maintenance of your sump pump is essential to ensure it remains in proper working condition when you need it most.
5. Implement Landscape Drainage Solutions:
Effective landscape drainage can significantly reduce the risk of flooding on your property. In Bountiful, where the terrain varies from flat to hilly, implementing proper drainage solutions is essential. Grade your yard away from your home's foundation to prevent water from pooling around the structure. Install French drains or dry wells to redirect excess water away from vulnerable areas. Incorporating permeable paving materials in driveways and walkways allows rainwater to infiltrate the soil rather than contributing to runoff. By managing surface water effectively, you can minimize the likelihood of flooding on your property.
Flooding poses a significant risk to homeowners in Bountiful, Utah, but with proactive planning and implementation of the right strategies, you can reduce your vulnerability to this natural hazard. By understanding your property's flood risk, investing in flood insurance, maintaining gutters and downspouts, installing sump pumps and backup systems, and implementing landscape drainage solutions, you can protect your home and belongings from the devastating effects of flooding. Taking these steps not only provides peace of mind but also ensures that your Bountiful home remains a safe and secure haven for you and your family, regardless of the weather conditions outside.
As homeowners in Bountiful, Utah, it's our responsibility to take proactive measures to protect our properties from flooding risks. By understanding our property's vulnerability, securing adequate flood insurance coverage, maintaining gutters and downspouts, installing sump pumps and backup systems, and implementing effective landscape drainage solutions, we can significantly reduce the impact of flooding on our homes and communities. Let's work together to strengthen the resilience of our Bountiful homes and ensure a safer, more secure future for all.
Revitalize Your Home with Spring Cleaning in Bountiful, UT: Let SERVPRO Lead the Way
4/8/2024 (Permalink)
 Spring Cleaning in Bountiful, UT
As the chill of winter fades away and the warmth of spring begins to bloom, it's time to shake off the dust of hibernation and embrace the revitalizing spirit of the season. And what better way to do so than by indulging in the age-old tradition of spring cleaning? In Bountiful, UT, where the majestic beauty of the Wasatch Range meets the serenity of the Great Salt Lake, there's no better time to breathe new life into your home than during the vibrant days of spring. And when it comes to tackling the monumental task of spring cleaning, there's one name that stands out above the rest: SERVPRO.
Embracing the Essence of Spring Cleaning
Spring cleaning isn't just about tidying up your living space; it's about embracing a fresh start, rejuvenating your surroundings, and revitalizing your spirit. In Bountiful, where the beauty of nature is a constant inspiration, spring cleaning takes on an added significance. It's a time to shake off the cobwebs, clear out the clutter, and prepare your home for the sunny days and warm nights ahead.
But let's face it: spring cleaning can be a daunting endeavor. From dusting high shelves to scrubbing stubborn stains, from organizing cluttered closets to deep cleaning carpets, the list of tasks can seem never-ending. That's where SERVPRO comes in.
Why Choose SERVPRO for Your Spring Cleaning Needs?
With a reputation for excellence and a commitment to customer satisfaction, SERVPRO is your trusted partner in the quest for a cleaner, healthier home. Here's why homeowners in Bountiful, UT, turn to SERVPRO time and time again:
Expertise: SERVPRO's team of highly trained professionals possesses the knowledge, skills, and experience to tackle even the toughest cleaning challenges. From specialized equipment to proven techniques, they have everything needed to leave your home sparkling from top to bottom.
Comprehensive Services: Whether you need a thorough carpet cleaning, a meticulous tile and grout scrubbing, or a complete overhaul of your HVAC system, SERVPRO has you covered. Their comprehensive range of services ensures that no corner of your home goes untouched.
Advanced Technology: SERVPRO stays at the forefront of industry advancements, utilizing state-of-the-art equipment and cutting-edge technology to deliver superior results. From powerful extraction machines to eco-friendly cleaning solutions, they employ the best tools available to achieve optimal cleanliness with minimal environmental impact.
Customized Solutions: Every home is unique, which is why SERVPRO takes a personalized approach to spring cleaning. Their team works closely with each client to assess their specific needs and develop a customized cleaning plan tailored to achieve the desired results.
Commitment to Excellence: Above all, SERVPRO is committed to excellence in everything they do. From the moment you contact them to the completion of the job, you can expect nothing less than the highest level of professionalism, integrity, and quality craftsmanship.
Spring Cleaning Services Offered by SERVPRO
So, what exactly can SERVPRO do to help you refresh and revitalize your home this spring? Here's a glimpse of their comprehensive range of services:
Carpet Cleaning: Say goodbye to ground-in dirt, stubborn stains, and lingering odors with SERVPRO's professional carpet cleaning services. Using advanced equipment and environmentally friendly cleaning solutions, they'll leave your carpets looking and feeling like new.
Tile and Grout Cleaning: Restore the beauty of your tiled surfaces with SERVPRO's thorough tile and grout cleaning services. Their specialized techniques penetrate deep into the grout lines to remove dirt, grime, and mildew, leaving your floors sparkling clean and sanitized.
Upholstery Cleaning: Give your furniture a fresh lease on life with SERVPRO's upholstery cleaning services. Whether it's a beloved sofa, a cherished armchair, or a vintage loveseat, their experts will carefully clean and protect your upholstery, ensuring years of comfort and enjoyment.
Air Duct Cleaning: Improve indoor air quality and enhance HVAC system efficiency with SERVPRO's professional air duct cleaning services. By removing dust, debris, and allergens from your ductwork, they'll help you breathe easier and enjoy a healthier home environment.
Odor Removal: Banish unpleasant odors once and for all with SERVPRO's advanced odor removal techniques. Whether it's smoke, pet odors, or musty smells, their experts will identify the source of the odor and eliminate it at its root, leaving your home smelling fresh and clean.
Experience the Difference of SERVPRO Spring Cleaning
This spring, why settle for anything less than the best when it comes to refreshing and revitalizing your home? Experience the difference of SERVPRO spring cleaning and discover why homeowners in Bountiful, UT, trust them to deliver exceptional results time and time again. Say goodbye to the dust and grime of winter and hello to a cleaner, healthier home with SERVPRO by your side.


 24/7 Emergency Service